


How to Fix Stuck Pixels on Laptops, Tablets,
Phones, and Computer Screens
A practical guide from someone who’s fixed more broken screens than they care to count
Let me cut to the chase. When I first encountered a stuck pixel, I assumed that the display was broken beyond repair. I was repairing a customer’s laptop, a relatively new one, and lo and behold, there it was—a blue dot dead center on the screen. Didn’t budge an inch, didn’t shift colors; it just remained static no matter what I did with it.
I was about to advise the customer to consider replacement display panels when a coworker, who had more experience repairing screens, suggested I try “cycling” it out. Forty minutes later, the blue dot vanished, never to be seen again. The customer considered me a tech wizard, but I simply discovered a technique that helped me deal with all future pixel problems.
It has been several years since then, and during this period, I have managed to encounter defective pixels in virtually all types of devices imaginable, from laptops to tablets, from smartphones to Chromebooks, from desktop monitors to iPads, iPhones, and even MacBooks. The methods have improved significantly; my skills have grown, and my success rates when it comes to fixing stuck pixels are extremely high. There is a difference between dead pixels and stuck pixels, but I will discuss this later. However, if you happen to have a stuck pixel on your display right now, there is a pretty good chance that you can fix it for free, no money needed at all.
This tutorial will provide all information necessary for identifying a pixel problem, running a stuck pixel test, and the best tools and techniques to resolve the issue. Let us take a closer look.
First and foremost, it is imperative to identify whether the problem concerns either stuck or dead pixels because both cases require different treatment methods, although many people confuse these terms including some specialists themselves.
Dead Pixels
It goes without saying that once you have dead pixels, they will not be restored. Dead pixels occur when a transistor stops functioning and fails, hence the pixel will remain dark for any screen content. As the name suggests, what you will see is a dark spot (dot) on the screen that will not disappear regardless of its activity, for instance, whether your computer displays a white background or a colorful video.
![]()
According to my own experience, accumulated after years of analyzing various screens with dead pixels, there is nothing to do with those with the help of software. As soon as a transistor fails, the game is over. There are only two ways left: either replace the whole display under warranty or exchange the screen itself.
But here is the problem – many customers who experience issues with stuck pixels believe that they have a dead pixel. Well, there is quite a difference between dead pixels and stuck pixels.
Stuck Pixels
When a pixel sticks, it remains live, receives electricity, but gets ‘frozen’ into one particular color. It will appear in the form of a dot colored red, green, blue, or white, and does not change its shade regardless of anything that is being displayed on the screen. Each pixel contains three sub-pixels (red, green, and blue). In case one of them remains activated, the whole pixel shows only one specific color at any time.
![]()
The thing is that I face issues with stuck pixels on a regular basis, and I have worked with many gadgets having various types of screens. The good part is that there are treatments which help to get rid of them in most cases. Unlike dead pixels, stuck pixels can be recovered thanks to special software for cycling pixels, and I will describe one such application in the next section.
The other thing that should not be overlooked: a pixel that seems to be dead is most likely to be found out to be a stuck one when you carry out the color test. That is why the importance of carrying out such a test cannot be overstated and that is why I never overlook it.
How to Properly Check Dead Pixels and Run a Stuck Pixel Test
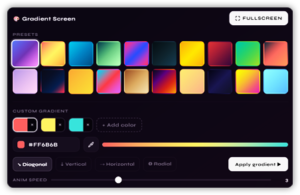
Testing of broken pixels under ordinary conditions is impossible. There are far too many visual details contained in regular images, website navigation, videos, pictures, for broken pixels to be visible properly. The only way to reveal defective pixels is by loading one single-color pattern onto the entire screen. And that is essentially what is required to do – choose a color and fill the display area with it completely, observing anything unusual on the screen. When the screen turns entirely green, anything but green will catch the eye immediately. Testing using a black pattern is particularly helpful as once the entire display goes dark, defective pixels will stand out like spots of light. Trying black, white, red, green, and blue patterns will give you an idea about how well your screen is functioning.
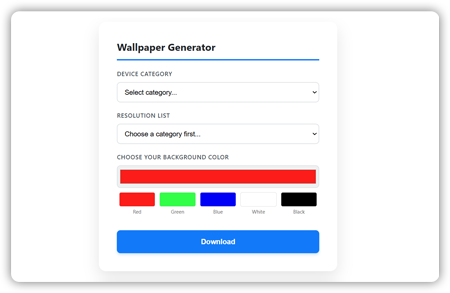
It is quite simple, it functions straight in your browser, thus no downloads are necessary, and works across all devices. Apart from being a good tester for colors, it is also equipped with a pixel repair tool, although we won’t discuss that until further along. At this point, all you have to do is open it in whatever device you’re using and begin the pixel sticking test.
Here’s how you do it according to the device you’re using:
If you’re using a desktop or laptop, all you have to do is just open your browser, navigate to the top of the page and choose the color(s), then click the full-screen button. Check the colors if necessary. Then get as close as possible and check the screen carefully from one end to the other.
On Mobile: Open Chrome or Safari on your smartphone, go to the page, and run the below videos which are of different colors in full screen mode. Run each video carefully. Because of the small size of smartphone screens, you can bring the device close to your eyes and observe the entire screen within seconds.
To test the dead pixels on your iPad, follow the exact process that you will carry out for testing the dead pixels on your laptop. The web browser is enough for running the test. Easy.Testing the stuck pixel on iPad problems and dead pixels on iPad problems can be carried out using the above process.
Dead pixels on Chromebooks – This is common in many budget Chromebooks. Open Chrome, go to the page, pick a color at the top of the page, make sure you are in full-screen mode, and then proceed as you would when testing any other laptop.
On MacBook Air: The dead pixels on the MacBook Air happen quite often, not only on the monitor but also sometimes on the Touch Bar. Launch your favorite browser such as Safari or Chrome, visit the website on top of this page, select any color, and then enter full-screen mode. Discovering that you have a dead pixel on your MacBook Air makes you feel a bit disappointed because you expect everything to be perfect since you’ve invested a considerable amount of money into it.
However, identifying the issue is still the same for every device you use. So, when you’ve successfully determined the exact location of the pixel, it’s time to find out what should be done next.
Our Pixel Fixing Tool: What It Is and What Is Doing
The logic behind the software used for fixing pixels is smart when you think about it. The pixel that is stuck at one place remains there for the simple reason that the sub-pixel inside it was not made to switch states for quite some time, or even froze itself due to a sudden power variation or prolonged static display phase. Fixing programs deal with this problem by switching the pixel back and forth in a fraction of a second, forcing it to change its state many times before freeing itself from the trapped state.
There is no certainty about this method. No method is ever certain when dealing with displays. To be honest, when I come across a pixel issue, this is what I do first. And most times, I have managed to resolve the problem.
This screen fixer you have on top of this page is my absolute solution for that problem. It simply does its job regardless of which device you use. Because it is browser based, you do not need to worry about downloading anything or dealing with compatibility issues. You can use it on a Windows laptop, a Mac, a Chromebook, an iPad, even an Android device. There’s nothing special you have to do. No administrator access required, no setting adjustments. Simply open your browser, and you will use it. For free.
The screen fixing tool works through presenting a rapidly blinking window with flickering pixels that you place at the location of the stuck pixel. You keep it there and wait. Typically, I would advise you to run the process at least 20-30 minutes each time and repeat the process twice. Some stuck pixels become visible within the first ten minutes while others need two or three complete attempts. However, some seemingly permanent stuck pixels became fixed after only the second try.
There is one thing that I can make very clear: our pixel fixer, and others like it, fix stuck pixels. These programs are not some form of sorcery. If your problem is what is called a ‘dead’ pixel and it appears on all colors, including white, then there is nothing that software can do to restore the transistor that failed. However, if the dot on your screen is any color other than black, then your problem is definitely one of a stuck pixel.
Device-Specific Advice: What I’ve Learned From Each Platform
Laptops (Windows)
Repair dead pixels on laptop screens; this is most likely the most typical service call I receive. Windows laptops at any price point may experience issues with stuck pixels, although budget panels with less rigorous manufacturing processes are more prone to such problems.
To resolve a stuck pixel on a Windows laptop, we use the pixel fixer. Firstly, you need to run the test to determine precisely what you are working with. Next, position the repair device on the pixel. In case it is still stuck after two attempts, completely power down your laptop; do not simply suspend it but shut it down entirely and disconnect it from the mains. Let it rest for an entire day and power it back up to test the repair software once more.
How to get rid of dead pixels on laptop screens – in cases where the pixel is indeed dead: record it, take photos, and check your warranty eligibility. Nearly all manufacturers have a policy on pixel defects, and having one dead pixel may be sufficient for the manufacturer to replace the whole panel under warranty.
MacBook Air
The problem of the dead pixels on the MacBook Air is fairly common and should thus be covered in a separate section. The thing is that screens of MacBook Airs, especially their Retinas, are simply outstanding, so anything wrong with them will look like an absolute catastrophe.
The dead pixel question usually comes up like that: “I spent a fortune on my MacBook Air; how come there is a dead pixel?” The sad truth is that even the highest quality screens do carry some risk of factory defects. This is true whatever the cost may be.
Fortunately, the policies of Apple’s warranties and AppleCare are relatively lenient compared to others. Thus, a dead pixel, especially one that can be seen, can usually be considered an excuse for a free screen replacement.
If your warranty period has passed, try running our pixel fixer utility. If it turned out that the pixel was not completely dead but merely stuck, it can be fixed with a utility. Otherwise, take it to an Apple Store.
iPad
I have faced stuck pixel and dead pixel problems not only on used iPads but also on brand new ones. In order to make sure it is indeed stuck pixel or dead pixel issue and not something else, one needs to access the Safari website, navigate to the top of the page, and perform tests using the colors.
There is also a unique feature of iPad I should mention because people confuse it with a stuck pixel sometimes. Image persistence refers to a temporary image left on the screen by the static app interface. If an app was active on your iPad for an extended period of time without the screen going dark, perform normal operations with varied visuals during a few hours first. Sometimes, a stuck pixel issue can solve itself.
If not, run the pixel fixer tool.
Chromebook
Chromebook Dead Pixels tend to appear mostly with Chromebooks that have been issued by schools or institutions and used frequently. Although there are no built-in features for detecting stuck pixels on Chrome OS, the fact that everything operates through the Chrome browser means that our stuck pixel detector operates seamlessly, simply visit this webpage and conduct your test right away!
To Chromebook Users: If you have an institution-issued Chromebook, you will need to take a clear picture of the dead pixel before making any complaints. Having this picture in hand when dealing with your IT department or school administration will greatly simplify things!
Phones (Android and iPhone)
The frequency of dead pixels on smartphones is less than on laptops. It is largely due to the fact that smartphones are equipped with high-quality OLED or AMOLED displays. However, they are also not safe from such defects, and if you drop your smartphone or expose it to excessive temperatures, it may develop dead pixels.
Android – Launch Chrome browser, load this page and load the video below. Then play it in full-screen mode, using all available color combinations.
iPhone – Follow the same procedure. In case you have an iPhone and discover some kind of defect on your smartphone display, make sure you are still covered by the warranty. The requirements of Apple with regard to displays are quite strict.
One of the first questions I ask all smartphone owners who are experiencing display issues: did you recently drop the device or hit it against something before the appearance of the pixel? If yes, it might be a physical damage to the display, which is not the result of faulty transistors or subpixels.
Desktop Monitors
In terms of monitors, a problem with dead pixels is even more annoying because of the size of the screen. You simply cannot overlook a dead pixel when using the bigger screen; it’s just too much.
To repair dead pixels on a desktop monitor, one must follow the pixel fixer method described above: open a web browser, perform a test, and run the repair tool if necessary for a stuck pixel.
However, there is another thing that you can do to repair a pixel on a desktop monitor that is not available for laptop owners – check the monitor’s warranty separately from your computer. Most monitors come with a different warranty from that of the computer itself; for example, LG, Dell, ASUS, BenQ, etc., usually offer some zero-dead-pixel warranty.
The Manual Pressure Method: When to Try It and When to Leave It Alone
This is definitely a question I receive often. The logic behind this remedy is using gentle pressure to literally push out the pixel that’s stuck.
What’s my honest advice? It may indeed work, but there isn’t much room for mistakes. In fact, this technique is known to both unstick a pixel that regular remedies couldn’t affect and damage a few adjacent pixels because too much pressure was applied.
Here’s what to do if you still want to give this trick a try: first of all, turn off the device. Put some soft cloth between your finger and the screen. Then apply very gentle pressure to the problem area for 10-15 seconds. Switch the device back on and see whether this method helped.
Never use any pointy object such as a pen or a stylus tip for this purpose. Never apply too much pressure, and never try this trick on the display of OLED phones because it may lead to more damage.
Not sure whether you’re going to be able to follow these instructions without causing harm to your device? Avoid trying then; software-based methods can work equally well.
When the Pixel Isn’t Going Away: Know Your Options
If you have done two to three cycles of pixel repair using the pixel fixer tool, performed the power-off reset, and the pixel remains intact, then you can assume that the pixel might be dead or extremely stuck and won’t react to any home remedies.
Now what? It all boils down to a couple of factors:
Check your warranty. In this regard, all devices are equal – laptops, iPads, Chromebooks, MacBooks, monitors. The only valid method of repairing a dead pixel would be replacing the faulty component via warranty. Fortunately, many brands provide coverage for visible dead pixels.
Photograph the issue. Run the white screen test and take a clear picture of the dead pixel. A snapshot of the pixel on a white background serves as undeniable proof and expedites the whole process significantly.
If the damaged pixels on your laptop screen are caused by physical reasons like a cracked screen, discoloration spread around the screen, or pressure damages, then you won’t be able to use any software programs to fix it, and you won’t be eligible for a warranty claim. The only thing left to do at this point is to seek an estimate from a reliable computer repair service.
Live with it, but do it wisely. This is definitely not the answer anyone hopes to get when asking for solutions to a dead pixel issue, but one or two dead pixels at the edges or corners of the screen can actually be manageable for many users. There are people who actually cover their dead pixels with electrical tape.
Final Thoughts From Someone Who’s Seen a Lot of Screens
When you discover dead pixels and stuck pixels for the first time, you may experience a moment of despair – a dot of less than one millimeter in size takes over all of your attention and ruins even the best working screen.
Most probably, you should not worry much about your device since a stuck pixel test performed with our app reveals all facts instantly. The vast majority of pixels, recognized as stuck, can be restored with some effort while there is no way to recover from dead pixels by using special applications.
To start, visit our website, open the browser-based app, perform the test and find out whether you are facing any stuck or dead pixels on your display. This process will not take more than five minutes, and after that, you can try to restore your screen within thirty minutes.
I have seen numerous occasions when it was impossible to guess if a pixel was dead until performing this test, and then the device turned into perfect condition again.